Showing posts with label Teaching Art. Show all posts

Tuesday, 24 November 2015

5 4 3 2 1...

Heading into the last four lessons of the term and thinking about the reductive lesson I'm teaching to my painting and drawing class. We're on week three of this lesson, and only at the second printing. It's time I think to reign it in and finish it off. We'll be adding any further carvings today and printing with black on top of the first colour.


And a few hours later after the lesson it's done. They look amazing. I'm exhausted and looking forward to a new lesson next week.


Friday, 20 November 2015

Right About Now


As unbelievable as it sounds, we're already past the middle of November which means December is looming and the end of term is right around the corner. I still have two more lessons focused on reductive printing for my Painting and Drawing students and the lessons I had planned to follow up are still looking good to me. With my preschool and toddler classes I'm wavering, in fact I've already changed my mind for the Art exploration lessons I was going to do this weekend. It's a bit of a running joke between me and the admin where I teach that I'm likely to change my mind a few times before a class starts. As much as we laugh about it and as much time and energy that I spend building a lesson plan I do quite often change my mind' sometimes in the twenty minutes it takes for me to walk to work.

So even though I'm sure I'll change my mind... It's time now to start thinking about Plans for next term. I'm fairly new to creating lesson plans. I don't have a background in education so how I plan lessons and create a lesson plan might not be what is common. I'll share my steps here to give you an idea of how i do things. I'd love to see how others approach planning too.


I use Pinterest heavily to build my lesson plans; not just for inspiration but also for organizing, and giving myself a visual reference of what I'll be teaching each week. On top of continual browsing and adding ideas to dedicated lesson inspiration boards on Pinterest; each term I also build a lesson plan board full of ideas to make my own; and in a few cases to just straight teach. And I don't want to forget that I also keep a board on Pinterest of lessons I have taught. When I get stuck I like to browse through that board to see if there are any techniques or lessons I can adjust or revisit. I have in the past taken ideas straight off of Pinterest and used them in my plans but I rarely leave them untouched, I may use a technique but change the subject of a lesson; or take a subject and try to adjust the techniques used so that each lesson is my own.

For Painting and drawing lessons I cross reference artists or art works; movements and elements of art to reference in the lesson with that Pinterest board.  For my Preschool classes I also look up books to read aloud to the class (combining literacy and art is an ongoing goal for me). Then I start compiling supplies needed for each lesson,  and start writing a description for each lesson that explains the steps, what elements of art I'm teaching and what the learning goals are.

I make a list of what dates I am teaching for each lesson and then use my calendar to figure out what order I'll teach them in and adjust any lessons to suit holidays or seasonal changes. In some cases I'll even try to coincide materials for different classes taught on the same day so that transition to the next class is simpler and clean up isn't too heavy or complicated.


Once I have a good idea of what I plan to teach each week Add my descriptions and supply lists into a word file that I can print for myself and email to the centre where I teach so that any supplies I will need can be stocked or restocked.

In a few cases I will source materials and include them in my invoice. When I make my plans I keep in mind budget restraints as on top of student skill levels and all the other things that  make a difference to the success of a lesson IE: that one time that there was overwhelming refusal by a whole class of toddlers to use strings dipped in black ink for a lesson and the subsequent improvisation that followed; and the adjusting of the plan for a later class to avoid the same problem later that day. 

All of this usually takes me a full day for each class to complete with a 1/2 day to edit and adjust for dates and overlapping classes. It's a lot of work but it's also the part where I get to become excited all over again about the upcoming term.

Thursday, 19 November 2015

About Setting up Boundaries


In any given class I am pretty open about what ends up on my young artist's final pieces because, Art. I love their creativity and I normally don't want to put up boundaries or barriers to their creativity because and I'll say it again: Art.

There are times, lessons, techniques, and projects that require boundaries, limitations and rules to be followed. This multi-week lesson is one of those times. While I am completely psyched to see my young students take a technique and subject matter to a completely different place than I could have imagined; I also think that constraining the boundless creativity once in a while is a wonderful way to flex the creative muscle in a different way.
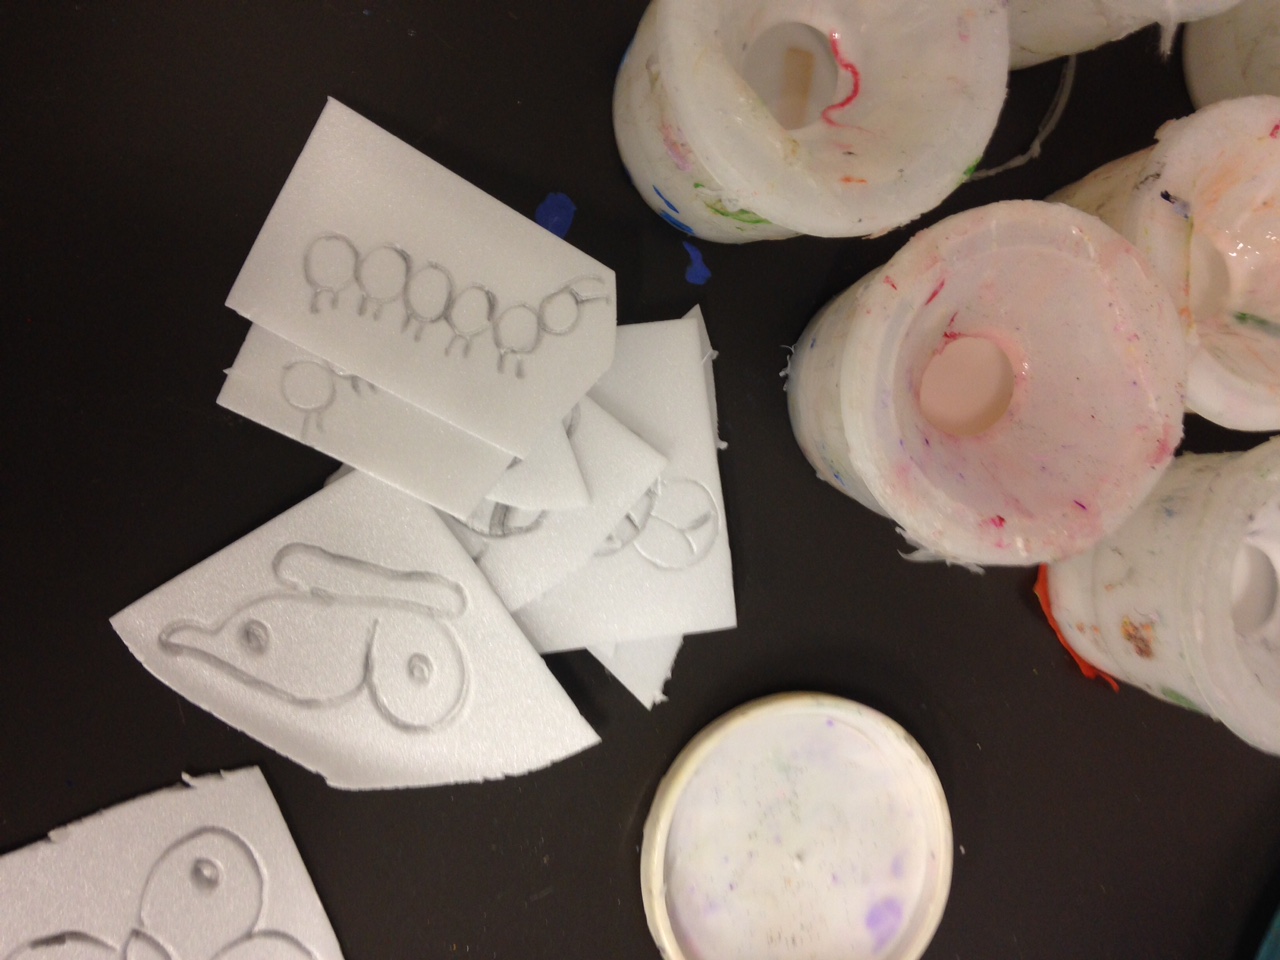
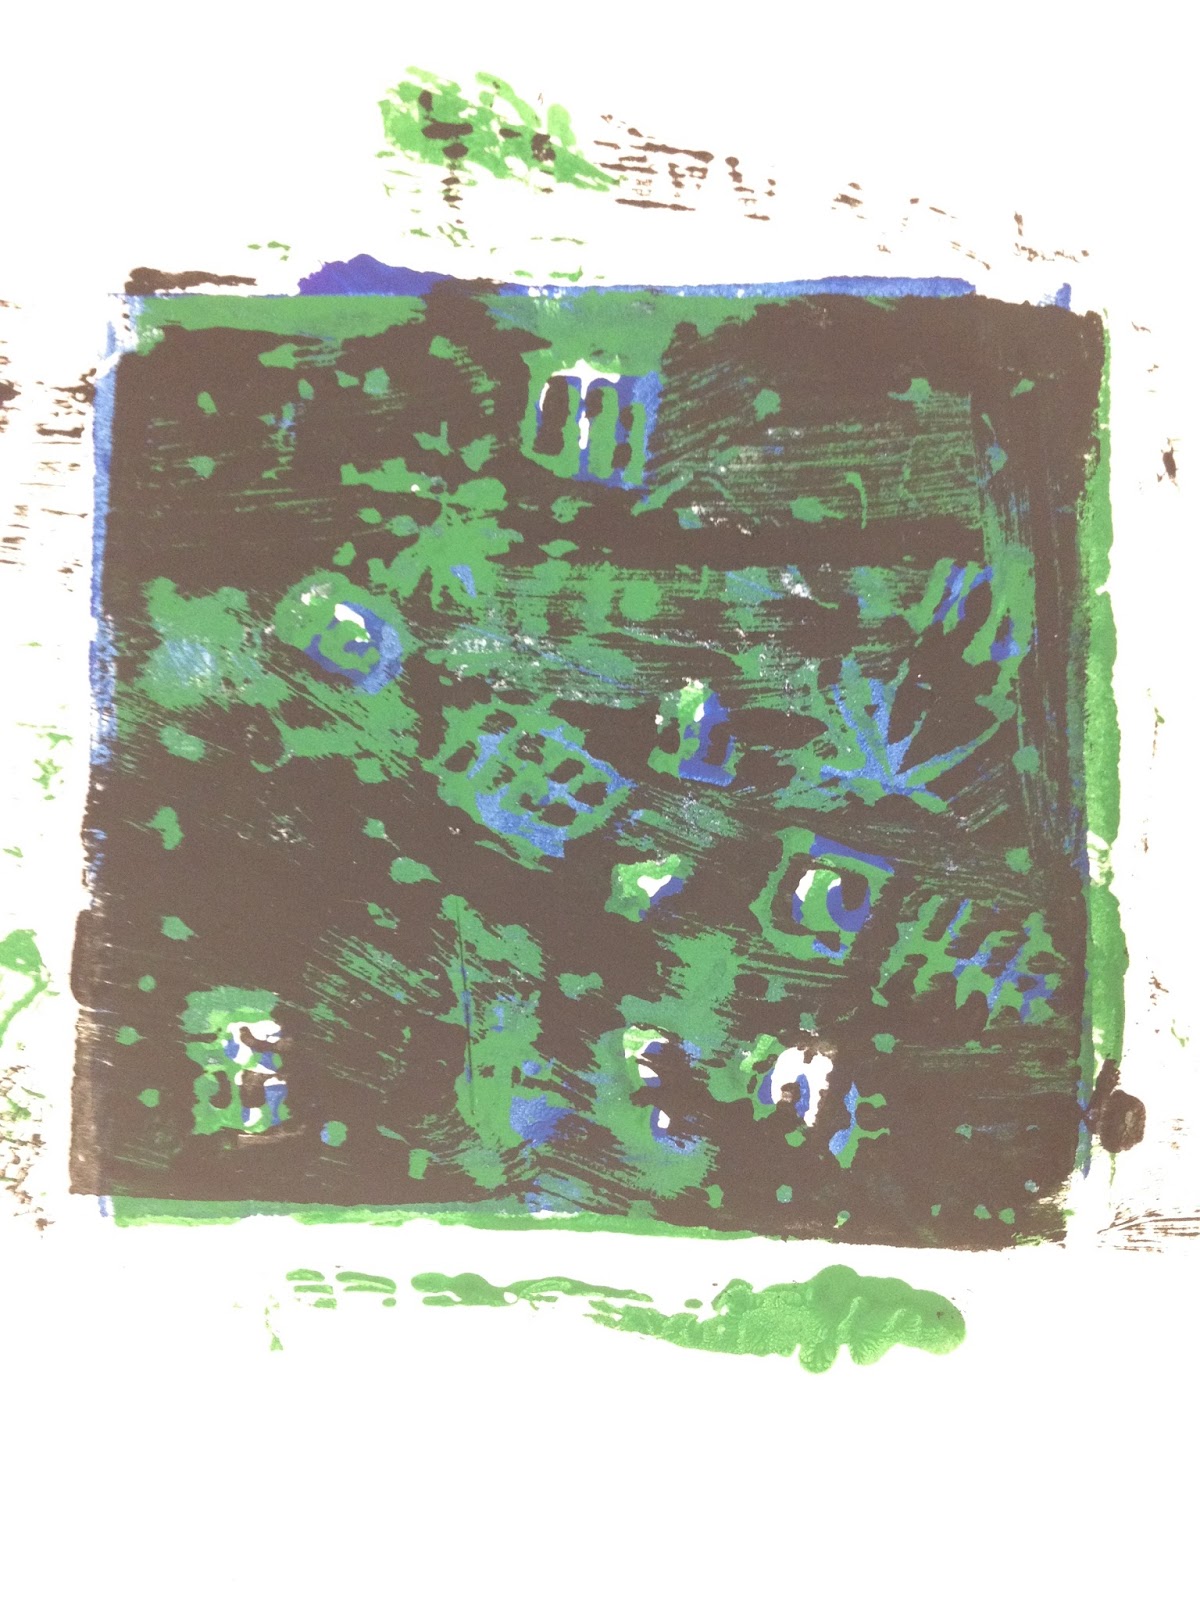
A reduction print using black, white and two other colours was going to be a tricky lesson regardless of the age and skill level of the students in my class. To make things simpler I reigned in the subject on top of the limits to colour application. Instead of a pictorial image I had my students use geometric shapes to create a pattern inside their image frame. They could place them side by side, overlap them or create an image with their shape. I then had them choose two colours to add to their composition leaving some areas white, filling in some areas with black and using the other two colours at their discretion.

All of this was shared at the beginning of the first of the classes  and revisited through out that lesson with explanations of why I had given them these limitations. Of course with out a finished project to demo for them there was a lot of confusion but for the most part they stayed within the restrictions I'd set out. I am a tiny bit humbled at that, these young people are putting faith in me to lead them through this mysterious project. The pressure is on.


 I have a few students who are know for owning boundless creativity and their work is highly detailed; often following their own inspiration as opposed to the subject demoed in a lesson. They use the techniques I set out in the lesson but create a work of art surpassing the lesson. Conveying to these free spirits the importance of working only within the boundaries I'd set up in this lesson was a battle fought on a slight incline that became steeper with each step.

I am currently wrapping my brain around ways to get these ideas across to these two young artists. When fine detail will hinder a project, when an abundance of colour can't be fit within the time frame of the term and will likely become too frustrating; and even worse, boring. As it is I'm already considering reigning in the lesson even more and taking out one of the colours in the design...

This lesson is one where not only am I teaching a technique but I am also learning about how best to teach it. I'm really looking forward to see how they all turn out and on top of that I"m looking forward to the lesson after this one is completed: a straight up painting project.


Saturday, 7 November 2015

Negative Space Take 2

My Preschool Art's Enrichment class also worked with the idea of negative space and Dots last week.

Here are their finished art.


Sunday, 1 November 2015

Back Into The Swing Of Things

Not that we've been out of the swing of things... perhaps what I mean is getting out of the Halloween imagery:


and onto something less holiday specific.


One of the challenges I'm finding with my Painting and Drawing class this term is the range of ages that my young artists fall into. I've found myself adjusting my lesson plans so that my younger students don't feel frustrated by their skill level and again so that my older students will still be engaged with the lesson. It's a thrilling juggling act and one that I take very seriously. I want my young artist friends to get as much out of our hour together as possible.

The images in this post are from a Painting and Drawing Pro-D camp I taught last week where the age range is about the same as for my weekly class. Regardless of what age my students are I am always able to talk to them about a part of their process that I watched them work through and what about their finished work I am really excited to see. While they are working I am also able to guide them in how they are approaching the project, sometimes giving them some insight that they might not have seen on their own. In some cases they have a very specific idea in mind and their finished art exceeds my expectations with very little input from me. Those are my favourite moments as a teacher; the ones where I get to learn something from my students.


As we move into November I've got some great new projects lined up for the Preschool classes and a multi week project for my older students that I am very excited to get started on.


If you are an art teacher how do you balance lessons with a varied skill level class room? Please share in the comments below.

Monday, 26 October 2015

Where's The Elephant, Cat Paintings and Pro D Camp work

It's really tempting to go in depth with each lesson I teach. Sometimes i's nice to just let the finished art speak for itself. 

Where's The Elephant? Art Sparks

Paint scraped over oil pastel cat drawings Arts Enrichment

Leaf Paintings Painting & Drawing


Monday, 19 October 2015

The Way Way Upside to Teaching to the Toddler and Preschool Set

Every child is an artist. 
The problem is how to 
remain an artist once we 
grow up. Pablo Picasso


And how you do that is by making a point to make art with toddler and preschool aged children as often as possible. In the two plus years that I've been teaching art to children and the two or so weeks I've  been posting about teaching art to children here; I've mentioned a smattering of times that my expectations for the final artworks for each of my art lessons is always exceeded by my little artists. 


It's how they approach making art that really does it. And it's really not that they all approach art making in the same way because boy do they not do that. What I mean is that they walk into the studio excited about making art. Even my highly anxious young artists dive into making art. Sure there are days that are better than others, there are days that the materials we use and the subject matter doesn't really do it but even on those days there is some form of visual expression that they can get behind. Even if it's just the first few minutes of class with markers and sketchbook the act of making art makes them happy.

In this week's Art exploration lesson I was treated to some serious observational skills from one of my young artists. An exploration of the materials and techniques used in the class that pushed outside the really good moment, pulled it back and pushed it further combined with a unique application that gave the creator's a super finished art work.

The lesson incorporates one of my favourite paint application techniques: gift card paint scraping and rolling. We also stamped into the painting with contrasting white paint. I pre-cut cat shapes and chalk pastel was used to add detail to the cat before it was glued down to the painting.


Friday, 16 October 2015

A moon, A Tree, an Owl and Masks

One big post about this week's classes. That's how I'm doing things this week, cramming lots into one little space....

on Tuesday I had my Arts Enrichment students practice using scissors and using both a brush and an eraser topper to apply paint creating a full moon backdrop for an owl collage. I read Moon Child to get us started. It's a lovely book that follows three nocturnal creatures as they relate to the moon in the sky. The music and movement portion of our class has us curling up into a ball just like one of the illustrations in the story and it was so much fun seeing my young friends make that connection.

I've mentioned using scissors is challenge for preschool and toddler artists. I took a trick I found online to help give my young artists the proper holding position for cutting with scissors. I had  everyone hold up their scissor hands and give the thumbs up sign. My co-teacher and I then went around the studio and drew a smiling happy face on their thumb nail. When they had the happy face smiling at them they knew that the scissors were being held correctly, cutting wen t much better with our happy thumbs.


I had a cancelation for an appointment on Tuesday in the afternoon which gave me time to make more low poly paper masks for my painting and drawing class Tuesday afternoon. I actually got some photographs of the still life set up and the final paintings were beyond what I thought I'd get.


My students each approached the still life differently. Some carefully observed how each of the low poly shapes aligned together creating a drawing and then painting that was proportional, others used the masks as a jump point and painted more symbolically and other's took the shapes within each low poly mask and used them to create a pattern within the drawing which they then painted.

I had each student look at the masks and name the part of the mask that was the whitest or lightest area, where the darkest shadows were and then to make note of the areas that were midtone. I then had them sketch from the still life, They then painted the highlight area white, the dark areas black and the midtone areas grey.


Friday, 9 October 2015

Patterns and Klimt

This term when I sat down to create my painting and Drawing lesson plan I thought a lot about what art elements I wanted to focus on. I wanted to pick an element and then combine each lesson with another element because no art element is an island or something similarly deep and arty...

Anyway, getting back to my point I chose a running art elemental theme to run through the terms lessons and the theme I landed on was Pattern. Pattern is the repetition of shape, form and texture to keep the eye moving around. Pattern creates balance, space, and helps to organise composition. 

With this in mind we took a look at Gustav Klimt this week. We took some time to look at some of Klimt's most popular paintings as well as some of his lesser works. We discussed the patterns that Klimt used most in the art that we were looking at and then we jumped tight into drawing a portrait. I don't often do guided drawings but sometimes a guided drawing with portraits and body proportions helps to get the idea of some of the basics cemented or at the very least gets the students thinking about what they are looking at. 

As you can see from these finished examples I had a pretty wide range of portrait styles with my young artists, With students aged 5 to 11 there is bound to be varying degrees of technique. I had my students dress their portrait with patterns and then create a background with even more repeating shapes using oil pastel. The final step in the lesson was to add a water colour wash over top of the oil pastel portraits and patterns. 


It's Thanksgiving weekend here in Canada. While most people have taken the less stress route when it comes to the Harvest feast I decided to take a different road this time around. I'll be making a lovely squash soup to take to a friends dinner party. I've committed to ham dinner with two sides and dessert on Sunday and another turkey dinner with stuffings and a few other sides on Monday. I'm going to be honest. I've got some lovely friends and family bringing dishes and important sides on both days but I will be focused on culinary creations for the next few days. I'd hoped to have a book review post about the two books I used in my lesson plans last week but those will have to wait until the thanksgiving food coma has passed or a lull in the cooking happens and or procrastination rears it's weird little head. If you are a South of the 49th you're big turkey day is coming... If you're a fellow north of the 49th parallel dweller Happy Thanksgiving. If you can go out and hit the early voting sometime in the next few days. I voted this afternoon and I couldn't express how awesome it was.


Saturday, 3 October 2015

Perfect Square


This time last week I was steeling myself for the possibility of only one class on Saturdays and I am pleased to now have two sessions of Art Exploration classes for two age groups Saturday mornings. Art Exploration as the name suggests an exploration of art materials and elements for toddlers and a caregiver and for children aged three to five. Last week we explored oil pastels and paint on paper with leaves. This week we're looking at things from the shape of a square

A few years ago I was in the library looking for a picture book that had a focus on circles for my very first art class at Artspace. While looking for a circle book I saw sitting on the shelf a book about a square. I of course picked up this book and brought it home all the while wishing that my lesson was about squares (because back then I was a little more rigid with my lesson plans; I was a new teacher and very far out of my comfort zone so keeping within my plan was all about coping). This Saturday class will be based on the illustrations in that book and that book is called Perfect Square by Michael Hall.

In the past I've taught this lesson in two parts. Students would paint a rainbow onto mixed media paper and then in a second class the paper is transformed with scissors, folding and cutting into a picture that has it's inspiration from one of the pages in the book. This time around, because we have an abundance of pre painted paper at Artspace we'll be creating our art from the stock of painted paper. Focus was on choosing papers that appeal to the artists, composing an image onto paper and practicing scissor and glue skills.


The purple pieces were done by my toddler artists. Each one of the artists was fully engaged in the process of the art today. During the lesson I was talking abut how focus in the  lesson is getting engagement from our artists and not looking for anything specific within a composition, I went on to say that often allowing the freedom to engage with the materials brings out some very amazing finished artworks. Today's lesson illustrated that point to a T. Each of the artists in the toddler class was allowed to compose their image with very little involvement from their caregiver. My favourite parts of the lesson was watching the thinking process in where things were placed on the page. In all cases the artists made very specific and engaged choices for their work and it shows.

The Blue backed art was done in the Preschool class. In this class we had the same focus and engagement. Each artist approached the project in very different ways. From the deconstruction of the backing paper into a new shape (which referenced our inspiration book) to the minimalist compositions and the compositions that used multiple layers and or broke out of the image frame. I was very pleased by the outcome of each class and love that I get to share the work here with you.


Wednesday, 30 September 2015

Still Life


My Tuesday afternoon Painting and Drawing class has student's aged 5 and older. This means that the style and skill of the artists in that class varies all along the spectrum of art skills for children. 

I should preface this post with an apology for not getting a photograph of the still life set up I had for this class. The time between set up and beginning of class is a bit of a crunch and Time got away from me. I set up boxes of varying height covered in draped fabric, Two glass jars with cut flowers, a pair of beautifully embroidered and beaded purple shoes and an assortment of fossils, minerals and crystals. I am really kicking myself for not thinking to document it until after getting home last night, it looked fabulous. 

To start with, we talked about lights and shadow and how they form shapes on the objects that we draw. We looked at examples of still life drawings and discussed how using light and shadow to create form inside a drawing also creates space within the drawing adding dimension. We also talked about looking at our subject and our drawing at the same time as we draw so that our eyes and our hands work together. 

Each student, dependant on time drew with charcoal on white paper focusing on shadows. They then drew with white chalk on black paper focusing on highlights and then finished on coloured paper using both the chalk and charcoal incorporating both highlights and shadows.

As you can see from the drawings I chose to display from the lesson, each artist's style is completely different; as is the way that they chose to look at and draw the subject. The older of the artists in the class focused on more detail, really looking at the still life and how the light and shadows worked within the composition. Some artists chose to interpret the still life into their own style of drawing and the younger artists were still able to capture the idea of what was in front of them with their emerging skill set. 

I chose my favourites from the finished drawings to display. 


Tuesday, 29 September 2015

More Flowers and Balloons

Just like last week I kept Monday and Tuesday lessons pretty similar. Since our Tuesday students are a little older and have a longer lesson than Monday, I added a few changes to extend the lesson. We started the lesson with a reading of the picture book Rose's Garden by Peter H Reynolds. I decided on a different book for this group because it was a little more involved than yesterdays while still keeping within the same theme.

My little artist's started their project by learning how to hold and cut with scissors; this is a skill we will revisit again and again with this age group. It's always a tricky lesson for me to teach and for the little ones to learn but it's very important for later when the same grip is used for holding a pencil. each child was given a piece of construction paper with a teapot shape pre-drawn on it. Following the instructions for holding and using their scissors each child cut out their own teapot. Every teapot is unique to the artist who cut it out. Some were given a little help by myself or my co-teacher, howeverthat number was considerably less than I anticipated. Given that the class size is quite big we did quite well with our cutting. We decorated our teapots with white glue and fine glitter and set them aside to dry.

We used balloons to create our flowers again filling our whole page with balloon impressions. Once our pages were covered in flowers we glued our teapot on top referencing the final illustration in Rose's Garden where the heroine's giant teapot sits as if floating on a sea of colourful flowers.


Monday, 28 September 2015

Week Two: Zinnia's and Balloons


It's week two and I'm anticipating the joys of balloon painting with my young artists. The cold I caught from one of my preschoolers has left me with a drippy nose and a scratchy voice. I didn't help this when I stayed out a little later than usual yesterday to see the lunar eclipse but it was worth it.


The technique I taught today and tomorrow is one I found on Pinterest and immediately tweaked. It has a big "wow" factor with the young ones and lends itself really well to certain subjects; flowers for instance. The Pin I first saw this technique used in was a take on Eric Carle's Hungry Caterpillar.  I love Eric Carle, some of my favourite projects are created with painted paper and collage. I think his paper collages are very distinctive and wanted to try something different in my own classes so I came up with a theme that I thought suited the technique even better and allowed for a little discussion about colour theory and of course the use of a varied and interesting colour palette.

Last week we collaged and painted leaves; very suitable for autumn. This week I'm bringing in some of the zinnia blossoms from my garden and blowing up balloons for the students to paint with. This lesson works best with a contrasty selection of paint in each tray and I do find that I have to impress the importance of not squeezing the balloons while painting to the students (otherwise: POP). I also find that it's a good idea to have a few extra balloons ready just in case. I have a hand pump to blow them up before the lesson begins. While we are on the subject I also try to blow the balloons up at most about 1/2 the capacity. This makes them easier for small hands to grasp, easier for transport inside the studio and also makes them less likely to pop. I have in the past used water balloons for this lesson with good success but the smaller balloons are also thinner and more likely to pop unexpectedly.


My co-teacher for the Artsparks class read the book Planting a Rainbow by Lois Ehert to our young artists and their caregivers and then once a short break had been taken and snacks consumed my class joined me in the art studio. Gree paint was used for grass and stems and then I had my young artists stamp their balloons into the marbled paint and then onto the paper. the wow factor happens when they see the colours transferred from the balloon onto the paper. The excitement from the ballon painting was felt throughout Artspace. As a final step white glue was applied to pre-drawn styrofoam stamps and a dusting of fine glitter was added to the tacky butterflies, caterpillars and bees wchich got this lesson a super double wow ovation.

When I left after clean up the art was still drying. Once it's hung I will follow up with images of the student's art.

The Really wonderful thing about this class is that all the caregivers are very open to letting their children, grandchildren and friends explore the materials in their own way. Of course there are small nudges here and there to remind our small artists what was said in the demonstration but the final work is always very much the work of our little artists.


 I use balloons for paper mache projects at Artspace as well a painting tool. Usually I save paper mache for week long camp lessons so that there is enough time to add a good number of layers. If you use balloons in your lessons let me know how they work out; if you have tried something different please share.