Showing posts with label Preschool Art. Show all posts

Friday, 5 February 2016

And The Schedule Is Still Full

I think that by the time I'm able to get caught up enough to post regularly it will be Winter Term end and Spring Break Camp. 

I apologise for the lack of posts while I try to get acclimated to the full schedule. I'll try to at least catch up with some finished art from the classes I've been teaching over the last few weeks. Below you can see a few. I've branched out into low relief and sculptural elements. 


Monday, 11 January 2016

Winter Collages

For Art Exploration on Saturday I had my students tear paper and glue it down to paper that had diluted blue, black and purple paint rolled onto it. We added daubs of white paint and finished off with oil pastel drawings of animals on clear adhesive shelf liner 

My demo piece for the lesson


 I especially love the drawings of each animal. This class contains mostly ages three and four yeatrs old and their drawings are always so much fun to see


A Wee Bit Delayed

Texture Turtle Art
January always seems to get ahead of me. While I'm able to keep up with the high priority, absolutely must get done things; the still important but not especially time sensitive things always seem to back up. Blog posting for instance.

Now I do have perfectly reasonable justifications for the tardiness of posting about last weeks lessons not least of which is the addition of three more lessons a week than  was teaching last term. The extra lessons while planned for are taking extra time. In addition I am also in the frantic planning stages of a birthday party set to take place at the end of the month.

So I'm playing catch-up which means that I'll be posting twice in the same day to get back on track. I could just include everything in one post but that's a lot of art for one post. Up top You can see the Texture Rubbing Turtle paintings from last Monday and Tuesday.

Below you can look at the Sky Colour Paintings and drawings created on Thursday. I especially love the drawn self portraits my young artists created to attach onto their paintings.


My special teaching assistant's piece 

Friday, 18 December 2015

Winter Is Coming

End of fall term is always busy. Holiday planning, shopping and celebrating takes up loads of extra time. The last week has seen my time parcelled out amongst three extra projects; small celebrations, card writing and winding up last classes and projects. 

The project below involved cutting, drawing and paper marbling using shaving foam and liquid watercolours. 


Wednesday, 25 November 2015

Owls and Fire Flies

This week we focused on monochromatic art in Art Exploration. Using oil pastel and watercolours we brushed orange onto yellow orange oil pastel and turquoise over top of blue oil pastel to create a yarn wall for a small owl to make a new scarf. We read Little Owl's New Scarf to get inspiration.

Little Owl in the wool shop. Oil Pastel, tempera paint
and pre-cut construction paper owl shapes 


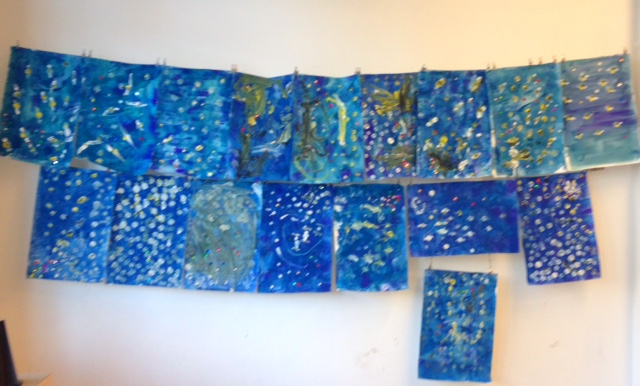
Arts Enrichment and Art Sparks have been painting using sponge rollers, pom poms and pencil grips to create an early evening sky with glowing fire flies inspired by The Brightest Star.

Tempera paint on mixed media paper with sequins

I have a Pro-D camp on Friday which is now consuming all my planning time. I want to do something different and have had no luck with my test projects. I have visions of my idea hanging in the windows at Artspace for the holidays.... I do have a backup in case inspiration fails but fingers crossed.

I also have a birthday party to prep for this weekend. A mixed media under the sea themed project is simmering in my head.....

Busy busy busy

Sunday, 8 November 2015

Mono Print Finished Art


While mono printing with this technique is an excellent invitation for parents to collaborate and create art together (without highjacking the work all together) only one of the images here is a true collaborative effort.* The rest of the singles I'm featuring were 100% the work of my young students. For the most part at the Toddler and Preschool age, images will be abstract shapes that kind of look like what the students will tell you they are drawing. Sometimes there are young artists that are very good at drawing what they see. In either case they are amazing.


For this lesson we drew on our printing paper with water resistant crayon or oil pastel, Students could trace the general outline of shapes onto the acetate sheets we used as mono printing plates, then flip that image over and then add colour with water soluble marker to the other side of the acetate.  We flipped the outline over so that the colours added to the image when we printed would match up with the drawing, other wise everything would be opposite.


While the colour was being added we soaked our paper in a water bath so that the images in marker would transfer onto our paper. When we were ready to print we used a squeegee to take away any extra moisture from the paper: The image transfers best when the paper is damp and not shiny wet.


*The group shot also has extra examples of collaborative parent child art. The cupcakes, butterflies and cats are parent participant art. The rest, including the animal face with the pink nose featured above; were all done by the children alone. 


Thursday, 5 November 2015

Circles: Background, Foreground and negative space in a Toddler lesson

Teaching foreground, background and negative space to the under 5 set is a tricky concept.

We used layering and window cuts in this lesson.


We started out with a piece of red construction paper with a taped together pre-cut circle. We drew on the paper with oil pastel and then added yellow paint with sponger and then set it aside to dry. We then brushed water all over our second sheet of white paper and brushed colour and spattered paint using toothbrushes.

Both sheets were left to dry and then I assembled the two pages together, Placing the cut out circle of red paper on top of the white painted paper and a sheet of purple construction paper onto the back of the red paper with the window cut. The display of finished art is giving the entry to Artspace a lovely warm glow that the overcast shorter days is really needing.

I did a variation of this project with my preschool Arts Enrichment Class. I will post about that once I've gotten them all put together.


Tuesday, 6 October 2015

Dragons and Sunflower Finished Art

 I'm posting the finished dragon paintings from yesterday here.


Yesterday we used paint and painted paper for our finished art. Today with the older group and a little longer class time I added a preliminary step to the process. Students used oil pastels to draw their flower centers, stems and leaves. We applied our flower petals using the same technique but the oil pastel resisted the wet paint allowing our centers, stems and leaves to peek out from behind the petals. My older artists got very creative with their dragons. We had a low relief dragon created by folding and bending the paper to stand out against the painted background. We had dragon's the emerged outside of the traditional picture plain some subtly, others more so. I'd love to say that I have a favourite (I actually do, one of the finished artworks below was created by one of my own children, as a mom hers is my favourite. I think it's amazing.) but as an art instructor I see amazing things in each finished art work posted below, and also the other two paintings that were still too wet to hang up when I took these photos. Watching today's artwork unfold I was very excited to see all the different directions my young artists were going with their art.


Tuesday, 29 September 2015

More Flowers and Balloons

Just like last week I kept Monday and Tuesday lessons pretty similar. Since our Tuesday students are a little older and have a longer lesson than Monday, I added a few changes to extend the lesson. We started the lesson with a reading of the picture book Rose's Garden by Peter H Reynolds. I decided on a different book for this group because it was a little more involved than yesterdays while still keeping within the same theme.

My little artist's started their project by learning how to hold and cut with scissors; this is a skill we will revisit again and again with this age group. It's always a tricky lesson for me to teach and for the little ones to learn but it's very important for later when the same grip is used for holding a pencil. each child was given a piece of construction paper with a teapot shape pre-drawn on it. Following the instructions for holding and using their scissors each child cut out their own teapot. Every teapot is unique to the artist who cut it out. Some were given a little help by myself or my co-teacher, howeverthat number was considerably less than I anticipated. Given that the class size is quite big we did quite well with our cutting. We decorated our teapots with white glue and fine glitter and set them aside to dry.

We used balloons to create our flowers again filling our whole page with balloon impressions. Once our pages were covered in flowers we glued our teapot on top referencing the final illustration in Rose's Garden where the heroine's giant teapot sits as if floating on a sea of colourful flowers.